Sway is one of the most dangerous travel conditions that we face as travel trailer owners. No matter how thoughtful you are with loading your trailer, sway can happen.
We have looked for hitch options that help reduce sway. One of the most efficient at reducing sway is the ProPride hitch. However, many travel trailer owners avoid them because the ProPride hitch installation seems very complicated.
Though the hitch itself is complex in its engineering and design, the ProPride hitch installation is not as complicated as it seems.
In this article, we will look at the ProPride hitch options and break down the ProPride hitch installation. We will help you feel confident in installing this hitch, the easy way.
What Is A ProPride Hitch?
ProPride hitches are the brainchild of Jim Hensley. In the 1970s Hensley set out to design a hitch that would effectively reduce or eliminate trailer sway. The principal theory behind his hitch design was to give the same level of control to a bumper-mounted trailer as that of a 5th-wheel hitch.
Hensley’s hitches are engineered to bring the weight of the trailer closer to the axle of the truck. As with 5th-wheel hitches, the ProPride hitch increases towing capacity while also providing a more stable connection to your tow vehicle.
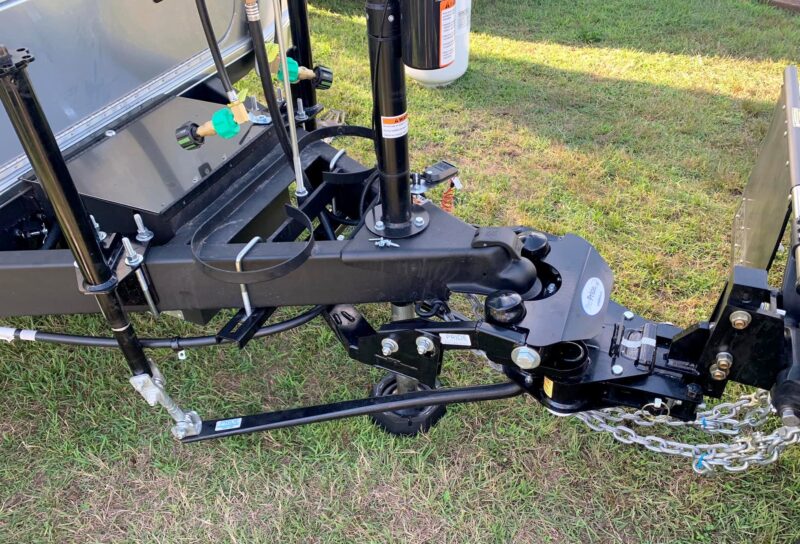
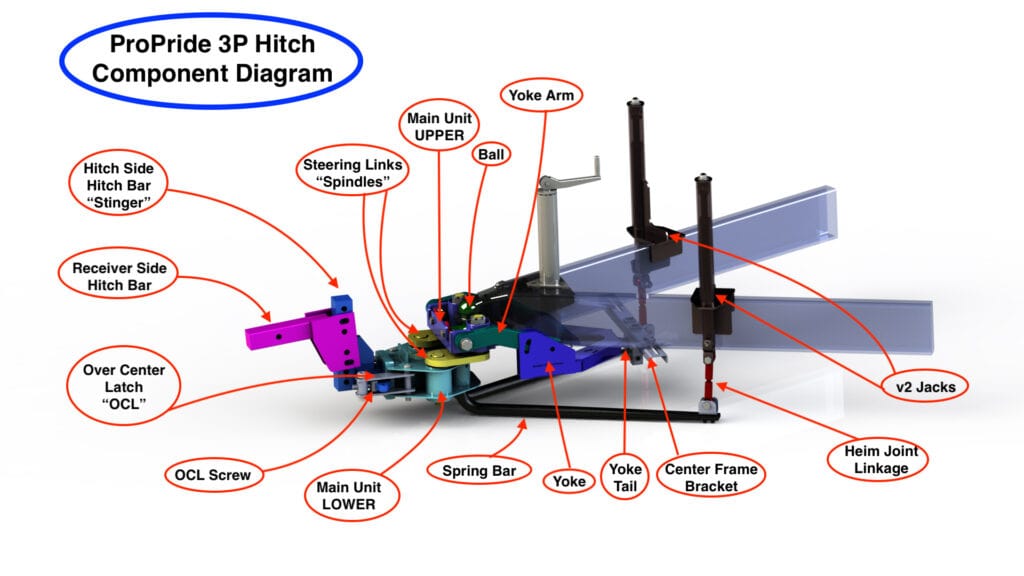
The most current version of the ProPride hitch is the 3P trailer sway control hitch. This hitch uses several parts to effectively eliminate sway or significantly reduce sway for bumper-mounted travel trailers. The ProPride hitch comes with 6 separate parts that work together to significantly reduce sway.
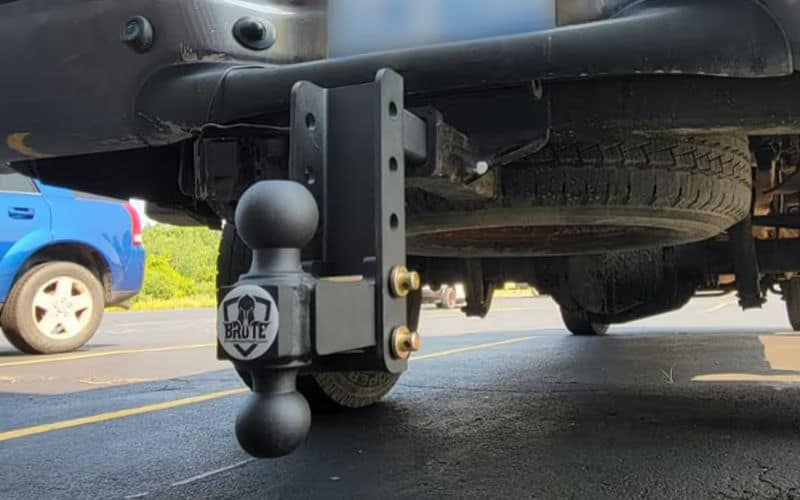
ProPride also offers a basic adjustable hitch, called the Brute Hitch. This is a good option for those of us who are not ready to invest in the ProPride 3P. The Brute Hitch is designed for trucks that have been lifted or for towing heavier loads.
How Much Is A ProPride Hitch?
The ProPride line of hitches tends to be a bit more expensive than other hitch options. For some travel trailer owners, the cost of the ProPride hitch may be daunting. Keep in mind that it’s much cheaper to purchase a new hitch than to upgrade your truck and trailer.
The ProPride 3P Hitch ranges in price between $3,150 and $4,000. The price of the hitch can increase if you need a larger hitch bar size. The standard size sold with most ProPride hitches is a 2-inch. However, you can, for an added cost, increase to a 2.5-inch or 3-inch hitch bar if necessary.
If you are looking at the ProPride Brute Hitch, you can expect to spend much less than you would on the 3P. As with the 3P, the Brute Hitch comes in four different ratings based on towing capacity and the amount of drop or rise you need. This line of ProPride hitches ranges in price from $230 to $350.
ProPride Installation Guide
Before we get into the instructions for installing a ProPride P3 hitch, remember, that this is a general breakdown of the process. For exact instructions, make sure that you follow the ProPride hitch installation guide. This will give more specific instructions that are necessary for a safe installation.
The first step to properly installing your ProPride P3 hitch is to park your truck and trailer on level ground. This will ensure that the measurements needed for the correct installation are accurate. If your trailer or truck is not level, your installation will not be correct, and you risk damaging your truck, hitch, and trailer.
Installation Steps:
1. Make sure you have the right 3P model.
Before you purchase your 3P hitch, make sure that you have carefully calculated the total tongue capacity of your trailer. If you are not sure if you have calculated enough cargo weight, it is OK to purchase a hitch with a higher weight rating.
2. Start by making the measurements necessary for installation.
You will need to measure the wheel-well height of both the front and rear wheel-wells. You will also need to calculate the amount of drop that occurs when your trailer is connected to your truck. To do this you will connect your trailer to your existing hitch, and then measure the height of the rear wheel well. This difference in height from the original measurement will be used to determine the proper configuration of the hitch bar.
3. Assemble the hitch bar.
The hitch bar will come in two parts that will need to be assembled based on the height of your truck and the amount of drop that occurs when the trailer is attached. Use the calculations in the ProPride hitch installation manual to determine the proper configuration for your truck and trailer. There are 12 possible configurations.
Assembling the hitch bar uses three large bolts with washers and nuts and a tilt pin. When connecting the two parts of the hitch bar hand tighten the bolts so that you can easily alter the configuration if you need to.
4. Attach the main unit to the hitch bar.
Before you attach the main unit to the hitch bar, you will need to install the hitch bar into the receiver on your truck and tighten the bolts. ProPride recommends starting by installing the hitch bar upside down so that you can ensure that there is no wiggle at the tilt pin. Using a socket wrench tighten the bolts so they do not move, but are not torqued to the required 200 pounds.
Remove and install the hitch bar in the correct position in the receiver. From here you can slide the main unit onto the hitch bar and connect using the two connector pins.
5. Install the weight distribution jacks
ProPride recommends that the jacks be installed 26.5 inches (plus or minus 1.5 inches) from the center of the hitch coupler. You may need to move or adjust the height of things like your gas tank storage if necessary to install the jacks in the correct location.
The jacks are installed on the tongue frame using two U-bolts for each jack. These can be securely tightened as recommended in your ProPride hitch installation manual.
6. Install the frame bar.
The frame bar is installed on the frame of your trailer, just behind the hitch coupler. The frame bar is the connection point on the trailer for the sway yoke.
Like the weight distribution jacks, the frame bar is connected to the trailer frame using two U-bolts with nuts and washers. Make sure you securely tighten the bolts and nuts as detailed in the installation manual before you connect to the truck.
When you have completed the first 6 steps, complete the installation when the trailer is connected to the truck.
7. Connect the trailer to the truck.
This step is just the same as it would be with a normal ball hitch connection. You will back your truck to the trailer and lower the trailer onto the ball located in the main unit of the hitch bar assembly. You will notice that the coupler fits snugly in the gap of the unit. This is important, as this secure connection is what keeps the ball from moving side to side within the coupler.
8. Install the spring rods.
The spring rods connect the leveling jacks and the hitch main unit. They will allow you to properly adjust the weight distribution jacks for a level and even towing condition.
9. Adjust the weight distribution jacks.
With the spring rods installed, you can now adjust the weight distribution jacks. This process will require you to either increase the height of the jack or lower it, depending on how level the trailer is on the truck.
10. Install the yoke
The last step of the installation is to attach the yoke to the hitch main unit and the frame bar. Use the provided pins and specialty connectors to secure the yoke at the proper points. Make sure that these connections are secure before you start traveling, as the yoke is very important in making sure that the ball does not move inside the coupler.
Remember that it is very important to properly secure all of the nuts and connection points before you start to travel. It is a good idea to check these connections periodically during stops in your travel. Make sure that you include a torque wrench and socket set in your travel trailer tool kit just in case you need to make adjustments or tighten any loose connections.
Why Are ProPride Hitches So Expensive?
There are a few reasons that ProPride hitches are so much more expensive than other hitches. However, for travel trailer owners who want to improve their travel experience, this expense is a lot less than buying a new trailer or truck.
The main reason that ProPride hitches are so expensive is the amount of research and engineering that goes into the design and development. These are not just your run-of-the-mill hitches.
It has taken years to understand the forces on a trailer hitch that cause sway. Making a hitch that nearly eliminates sway also has taken many years and lots of work from engineers and designers.
All ProPride hitches are made in the United States using heavy-duty steel. This higher quality, more durable material is more expensive but also makes for a reliable and long-lasting product.
Because the product is such good quality, it has a sound reputation among travel trailer owners. This exceptional performance also increases the price of the ProPride hitches.
Are ProPride Hitches Worth It?
ProPride hitches are an amazing product, and for the right RVer, they are a great investment. The RVers that will get the most benefit from the ProPride 3P hitch are those who are on the road a lot.
If you are a full-time or nearly full-time RVer, a ProPride hitch will make a huge difference in your travel comfort. It will also allow you to travel longer distances since you can pull at slightly higher speeds.
It is also a great investment for owners of larger travel trailers. Large travel trailers tend to be impacted more significantly by sway than those of us pulling a teardrop or pop-up. Even if you are just an occasional traveler with a larger trailer, the ProPride hitch can make a difference.
ProPride Hitch User Reviews
Although we do extensive research to produce our ratings and reviews we think it’s important to see what other users have to say.
You can check out the reviews on the ProPride Amazon reviews page, which has a rating of 4.5 out of 5 stars. At the time we wrote this article there are only 4 reviews to read.
You can also check out TrustPilot reviews of ProPride, which has a rating of 4.9 out of 5 stars and over 2,000 reviews!
And finally, you can read over 300 testimonials from happy customers on ProPride’s Product Reviews Page.
Final Words About ProPride Hitches
ProPride hitches are a great investment for travel trailer owners. These complex hitches are designed to reduce sway and make your travel experience more comfortable and safer. However, many RVers are deterred from them because the ProPride hitch installation seems too difficult.
If you are considering a ProPride 3P hitch, installation should not be a dissuading factor. The ProPride hitch installation manual is easy to follow and provides plenty of step-by-step instructions for every phase of installation.
For those who are willing to take the time to work through the ProPride hitch installation, your result will be a more enjoyable day on the road, and increased peace of mind that you will travel safer than you have before.
Related Reading:
– How To Release A Hitch That’s Stuck On A Ball
– How To Stop A Trailer Hitch From Squeaking
– A Closer Look At Andersen’s Ultimate Hitch Failures And Problems
– Should You Grease Your Trailer Hitch Ball Or Not?
About the Author:
Jason Gass is a full-time freelance writer and part-time RVer whose goal is to share great stories around a campfire with good friends.
When he’s not working, he spends most of his time camping, searching for the best breweries, and road-tripping in his teardrop trailer with his wife, daughter, and two dogs.