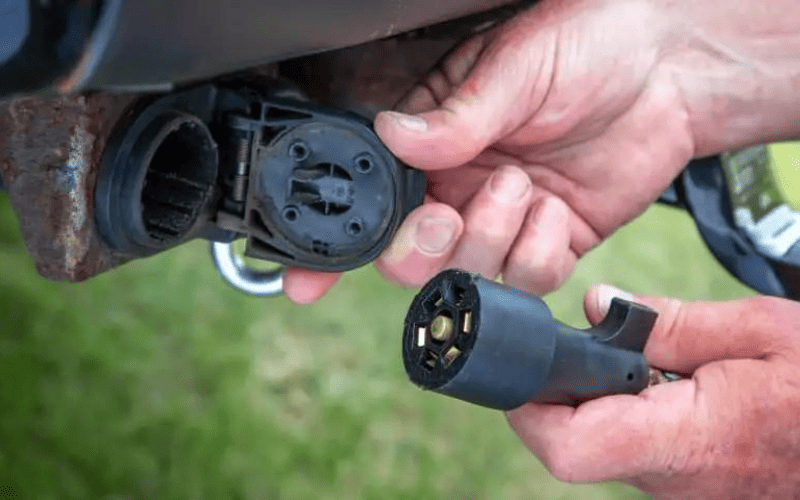
We own a travel trailer and recently replaced our 7-pin trailer plug. So we thought we would write an article showing you how to replace a 7-pin trailer plug.
For travel trailer owners, the 7-pin trailer plug is an essential part of towing your rig. The 7-pin trailer plug not only provides power to your trailer when it is being towed, but it is also essential for safety.
Because the 7-pin trailer plug runs between your trailer and tow vehicle during travel, it takes a lot of abuse. Eventually, the plug can wear out and may need to be replaced.
Replacing your 7-pin trailer plug is a fairly simple process for most travel trailer owners. In this article, we will take a look at how to replace your 7-pin trailer plug and also provide some simple instructions to help you along the way.
What Is A 7-Pin Trailer Plug?
A 7-pin trailer plug is the most common connection plug for travel trailers. These distinctive plugs are typically what’s used on travel trailers.
Controlling the safety lights on your travel trailer when it is being towed is the main function of a 7-pin plug. This includes your brake lights, turn signals, and also the side marker lights.
The 7-pin plug is also used to charge the battery for the RV. The final operation is the functioning of the trailer brakes.
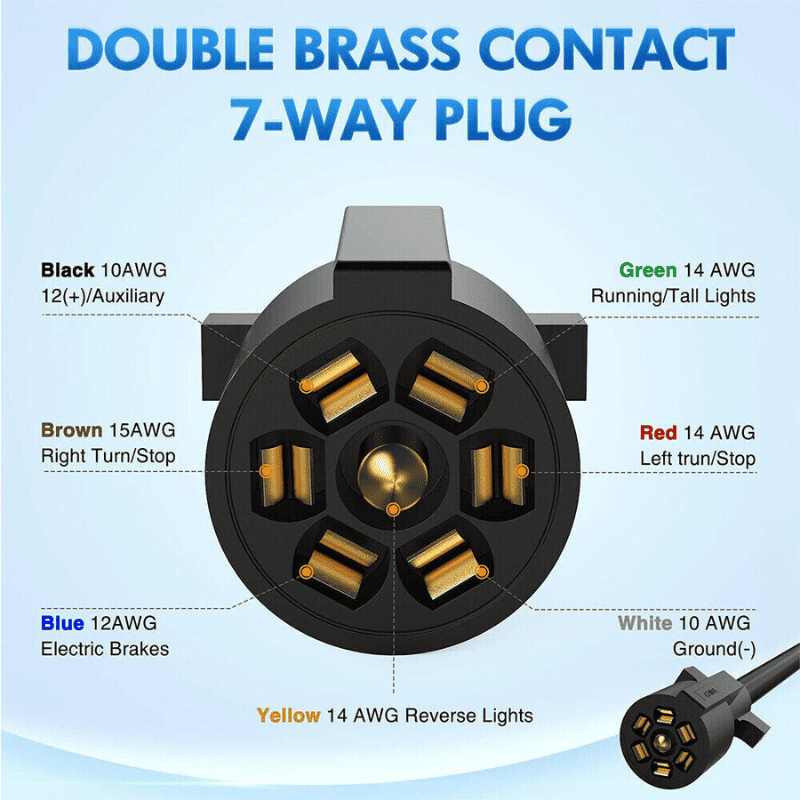
Since the 7-pin plug is the standard for most travel trailers, it has some features that are similar to every plug. The most obvious is the housing for the plug is always round with a square raised section.
This raised section allows the plug to be inserted into the receiver in only one direction. The specific direction in which a 7-pin trailer plug is inserted allows the wiring to provide electricity to specific parts of the trailer.
Are All Trailer Plugs The Same?
While it would make sense for every travel trailer to have the same plug, not all 7-pin trailer plugs are the same. For travel trailer owners, including me, this is a huge frustration.
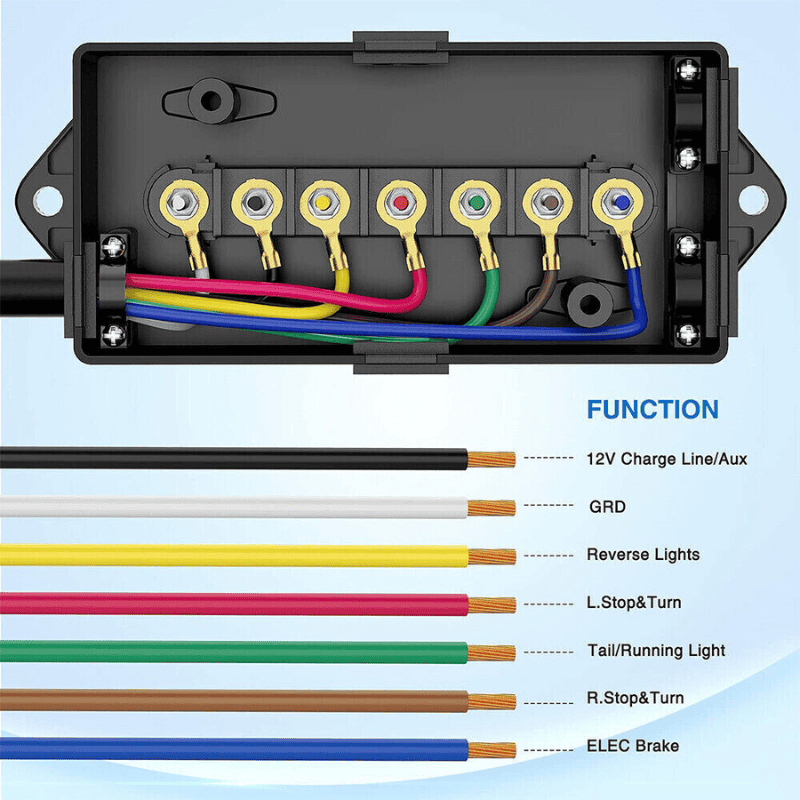
The most common difference you’ll find among 7-pin trailer plugs is with the wiring colors. Not all manufacturers, however, use the same color wires. Typically, you will find that most 7-pin trailer plugs are wired as follows:
- Black – 12V battery power
- Brown – right turn signal and brake
- Blue – brake controller output
- Yellow – reverse lights
- White – ground
- Red – left turn signal and brake
- Green – tail and running lights
You may find that your replacement trailer plug has this arrangement of wires slightly altered.
To ensure that you properly wire your new plug to your trailer, you must compare the wiring diagram in your owner’s manual with the diagram provided with the replacement plug.
If you have a small trailer with no brakes, it may have a 4-pin plug that controls only lights and possibly charging. If this is the case, the same problem of colored wires being different can exist.
How To Replace A 7 Pin Trailer Plug
Now that you know what a 7-pin trailer plug is and how it works, it’s time for us to discuss replacement.
There may come a time when you might need to replace your trailer plug because it has become worn or damaged. In the section below, we will give you basic instructions for replacing your 7-pin trailer plug under three different scenarios.
Before you start replacing your 7-pin trailer plug, you will want to have some tools on hand to make the process quicker. Tools that are helpful for this process include:
- Wire cutters
- Wire stripper/crimper
- Phillips screwdriver
- Flathead screwdriver
- Socket set
- Impact drill
- Self-tapping screws
- Ring terminals
- Box cutter
- Electrical tape
- Lead-free solder
- Soldering gun or iron
- Butt connectors
- Heat shrink tubes
- Heat gun or hair dryer
- Loom tubing
- Zip ties
Keep in mind that you may not need all of these tools for the repair that you are intending to make. Any good RV tool kit will include the above items.
RV electrical repairs are common and items like a wire-stripping kit are essential for RVers.
1. Replace Your Trailer Plug by Installing a Junction Box
This is the easiest way to replace a 7-pin trailer plug. If you are not comfortable with splicing wires, a junction box kit is your best option.
- Remove the cover of the junction box so you can see the wiring panel.
- Use self-tapping screws to attach the junction box to a location on the trailer frame.
- Pull your trailer wires from the old plug to the junction box.
- Cut the trailer wires to the proper length so they are long enough to reach the junction box, but not too long, causing the wires to rub, or too short, causing the wires to pull.
- Strip the insulation from each wire strand and attach a ring terminal to the end of the exposed wire using a wire crimper.
- Using a small socket, remove the nut on the terminal post for each wire in the junction box.
- Slide the ring terminal for the matching (or coordinating) wire from the trailer onto the terminal post in the junction box.
- Return the nut to the terminal posts using the socket.
- Insert the plug into the receiver of your tow vehicle and test all of your lights and ensure that the brake controller is communicating with the brakes.
- Replace the cover of the junction box.
- Secure any parts of the wiring that may be hanging so it does not become damaged.
2. Replace the Trailer Plug End
If the wiring for your trailer plug is good but the plug end is beaten up and not making a good connection, you can replace just the plug end.
The metal terminals becoming corroded is another common issue with trailer plugs. In this case, replacing the plug end will ensure a good connection. And using dielectric grease can prolong the life of your new trailer plug. For more info on this check out our article called Should You Use Dielectric Grease On Trailer Plugs?
- Use your wire cutters to cut through the wires in the cord, as close to the old plug as possible. This will remove the old plug end.
- Carefully cut through the rubber wire shielding to expose the wires. Be careful not to cut too deep or you can damage the wires inside.
- Use your wire strippers to remove the shielding from all of the wires in the bundle. You should not have to remove more than one inch of shielding.
- Pull the cord through the base of the new plug housing
- Attach the center wire to the middle terminal connector first. In most cases, this will be the yellow wire. Use a screwdriver to tighten the connector around the wire.
- Repeat this process with the other six wires, matching the wire in the cord with the wire in the plug head.
- Slide the plug housing up to the terminal assembly and align the slot in the housing with the grove on the plug.
- Tighten the set screw on the plug housing to hold the plug head securely into the housing.
3. Splice In Your New Trailer Plug
This repair is ideal if your wire harness becomes pinched and you must replace a section of the cord and plug. This is the most complex of the repair options. If you are not comfortable with splicing electrical wires, you may want to have this repair done by a professional.
Note on soldering:This process, ideally will involve soldering wire connections. If you don’t have access to or skills to solder, waterproof butt connectors and heat shrink can be used.
- Cut the damaged plug cord above the damaged point, removing the pinched or damaged section.
- Use a box cutter to carefully remove the rubber shielding. You will want to remove at least 3 inches of the shielding.
- Using a wire stripper, remove approximately 1 inch of the shielding from the individual wires on both the new plug harness and the cord attached to your trailer.
- Compare the wire colors to make sure that you connect the proper wires from the new harness to the wires on the cord on the trailer.
- Slide a heat shrink tube onto one side of each wire, and bend the wire slightly so the heat shrink does not fall off.
- For each wire pair, twist together the exposed wire ends.
- Using your soldering gun and lead-free solder place a small amount of solder on the twisted wire bundle to secure the two wires together. Repeat for each wire pair.
- When the solder has cooled, slide the heat shrink over the exposed, soldered wire, and use your heat gun or hair dryer to “shrink” the heat shrink over the wire. This will make a watertight seal over the repair.
- Using electrical tape, wrap the entire bundle of wires, starting at the rubber wire shielding and extending to the other rubber wire shielding.
- Cover the new repair with a section of loom tubing. Secure the loom tubing at each end with zip ties.
- Insert the new plug into the receiver of the tow vehicle, test all lights, and confirm that the brake controller senses the new plug.
Can You Plug A 4-Pin Trailer Plug Into A 7-Pin?
Some trailers come with only a 4-pin plug. You’ll find these to a greater extent on smaller travel trailers like teardrop trailers or small pop-up campers.
Most tow vehicles come with a 7-pin receiver, and you probably do not want to replace this standard feature. If you have a 4-pin plug and a 7-pin receiver, you can purchase a 4 pin to 7 pin adapter that will allow you to use your 7-pin receiver.
These adaptors are very easy to use. Many are plug and play, so there is little effort or need for electrical modifications.
However, you will need to remember that even though you are using a 7-pin plug, it will only provide power to the 4-pins that come from your trailer wiring. This means lights only, no trailer brakes.
What Is The Difference Between Round And Flat Trailer Plugs?
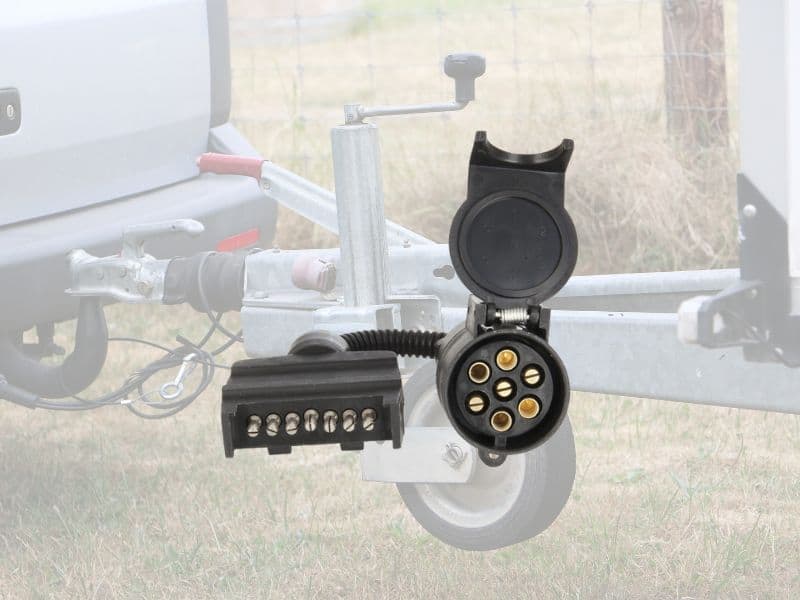
You may notice that trailer plugs come in two shapes, flat and round. There is a difference between the uses of these two plug shapes and how they are used on travel trailers.
The round trailer plug is what you typically find on travel trailers. These round plugs are most frequently 7-pin or 12-pin, depending on the size of your trailer. Round trailer plugs usually have connections for more lighting and provide power to the trailer’s braking system.
Flat plugs are common on trailers such as flatbed trailers, small trailers for moving, trailers for hauling recreational toys, or small campers. The flat plugs for these trailers power lights for the trailer but typically will not provide power for braking systems or charging for RV batteries.
Final Thoughts About Replacing A 7 Pin Trailer Plug
The 7-pin trailer plug is an essential part of most travel trailers. This basic piece of equipment is essential for travel safety and powering your RV batteries and electrical system. Trailer plugs take on a lot of wear and tear and may eventually need to be replaced.
If you find yourself with a damaged or worn 7-pin trailer plug, there are plenty of options for installing a new one. For many RV owners, replacing a 7-pin trailer plug can be a simple task requiring minimal experience in electrical wiring.
Related Reading:
– Should You Use Dielectric Grease On Trailer Plugs?
– How To Release A Trailer Hitch That’s Stuck On A Ball
– How To Stop A Trailer Hitch From Squeaking
– 10 Best RV Tire Pressure Monitoring Systems
– Best Apps For Leveling Your Camper Trailer
About the Author:
Jason Gass is a full-time freelance writer and part-time RVer whose goal is to share great stories around a campfire with good friends.
When he’s not working, he spends most of his time camping, searching for the best breweries, and road-tripping in his teardrop trailer with his wife, daughter, and two dogs.